THE ARENA BENEATH LLORKH
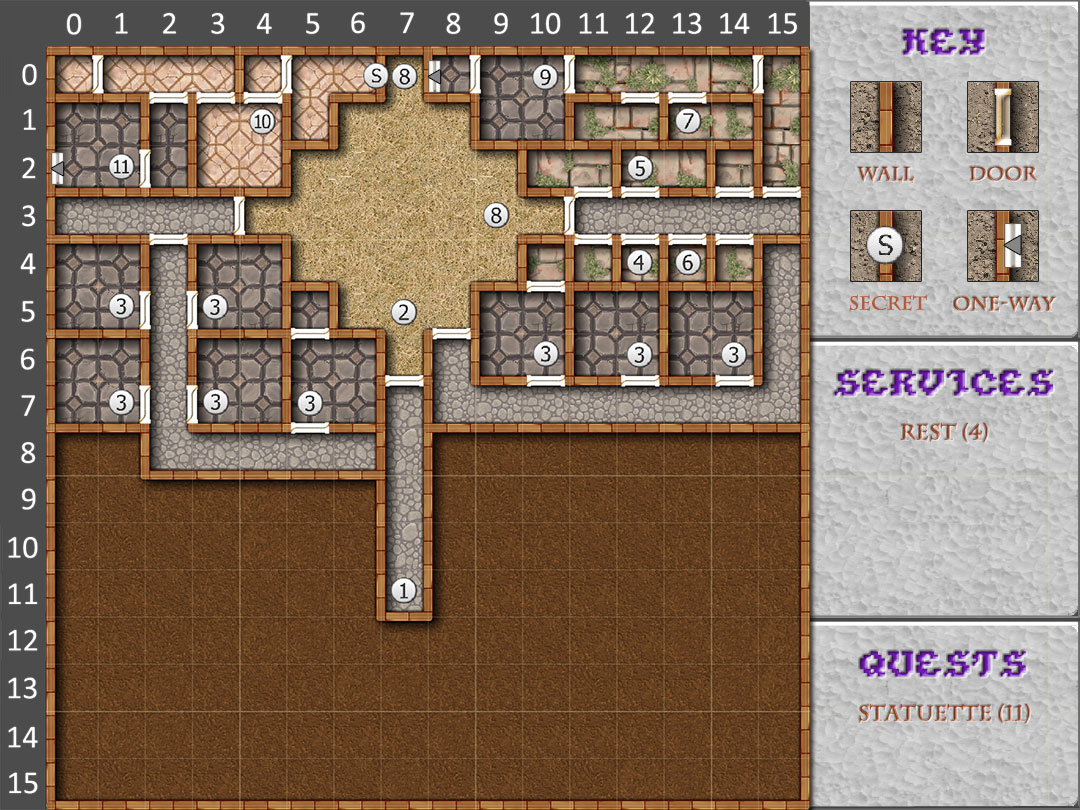
 1. Entrance – This is where the party is dumped when they slide down the tunnel after being trapped in Llorkh.
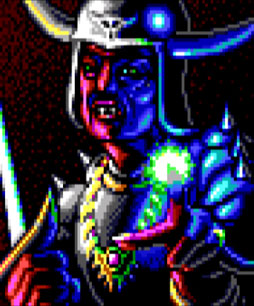
2. The subterranean arena – When the party enters, the statuettes are taken from them. If Rishpal is with them, he is congratulated for having spied on the party for Vaalgamon and returns to the general’s side.
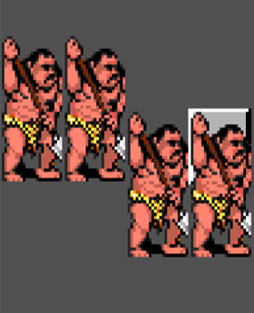
The party engages in three combats in succession, with no opportunity to rest between battles. They fight groups of ogres, hellhounds, and then griffons.
After winning all three battles the party is taken to a cell.
To win these battles the party must usevits spells only when necessary. Make surevthe archers have plenty of arrows and thevmagic-users have enough darts. Only thevogres can be affected by Sleep spells, so use those in the first combat . If the party has a fifth level magic-user a Fireball spell can be used in one of the remaining battles and Stinking Cloud spells in the other.
Against all these enemies try to finish off all but one opponent and then surround the survivor to attack it on all sides.
3. Barracks – These barracks contain Zhentarim forces.
4. Party’s Prison Cell – This is the small cell where the party is imprisoned after winning the three battles in the arena. Take advantage of the chance to rest and rememorize spells, and save the game.
Once the party has rested (or an hour has passed) a jailer comes to feed the prisoners. Someone in the cell next door attacks him, and a party member has a chance to grab the keys-select the thief or the character
with the highest dexterity.
They unlock the cell and move outside. The creature who attacked the guard asks the party to release him from his cell . He is a half-orc named Muthtur, and offers to join the party. If the party accepts his offer, he
fights loyally at the party’s side.
Go to the other cells and release only those monsters who can help in the big battle in the arena, as noted under the cell label numbers below.
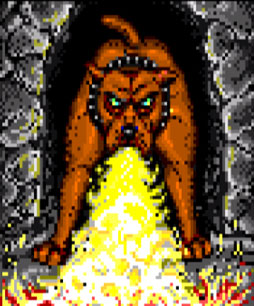
5. Prison Cell – A hellhound is in this cell. Release it after releasing the ogres and it runs down the corridor to the arena, where it helps the party fight a major battle.
6. Prison Cell – A small group of ogres is in this cell . If the party has not released the hellhound they can set the ogres free and they help in the arena. If the hellhound is already free the ogres attack the party.
7. Prison Cell – A griffon is in this cell. It immediately attacks the party if it is released.
8. Encounter – A large number of griffons block the party’s way when they reach either of these points; if the hellhound and/or the ogres were set free they fight on the side of the party dunng this battle. Even with help from several strong monsters, this is a very difficult battle. At the very beginning of the fight open up spaces
in the party’s line of fighters to allow the ogres and hellhound room to move up to attack the griffons. Make sure to keep the magic-users in the rear and use spells to wear the griffons down, but try to position the spells so the party doesn’t hurt their monster allies.
9. Encounter – Several Zhentil fighters are in this room.
10. Encounter – Griffons attack the party here.
11. Statuette (Quest) – Zhentil fighters and the Zhentil commander are admiring the statuette of the North here. Once the party defeats them, they find the statuette of the North and all the other statuettes that were taken from them.
After the battle the party discovers that one of the fighters they just killed was Rishpal, Vaalgamon’s spy.
From here the party is returned to Llorkh. Once they have gained the statuette of the North the shops, etc. in Llorkh function normally.
 Synopsis: This is where the party finds the statuette of the North.
Once the party is trapped in a shop in Llorkh, they slide down a long, slippery ramp and are dumped at one end of a tunnel. They emerge from the tunnel into a large arena, where an audience of humans, orcs and other monsters waits eagerly to watch their demise . To their horror, the statuettes the party have gained are taken from them.
Vaalgamon expresses his delight at getting to see the party butchered. He tells them that they face three opponents in the arena; if they defeat all three they will be allowed to live.
The party has to cleverly budget their memorized spells, magic items and fighting strength to get through all three battles, as there is no chance to rest between fights.
After the party defeats all three sets of monsters, Vaalgamon congratulates them, says they have won the right to see another sunrise.. .and promises three more sets of enemies on the next day of combat. He laments that he cannot stay to see their deaths since he must go north to Ascore to supervise the coming invasion.
The party is taken off to a cell. They must escape and reach the Zhentarim commander’s office to reclaim their statuettes, then make their way back to the surface.
Rest: The only places the party can rest safely are a) in the barracks areas after 5 successful wandering monster encounters and b) in the cell areas at any time.
Wandering Monsters: In the barracks, 5 groups of Zhentil fighters attack the party.
Commodore 64 Owners: Some of the monsters in the cells and in the second arena battle may be different from those listed below due to technical constraints. However, the same combat strategies should apply.
 Objective: Escape your Prison Cell, get your statuettes back (including the new one – The Statuette of the North) and return to Llorkh.
Experience: The opening sequence contains 3 battles in a row, make sure your party is ready for these encounters. Clear out all areas here and along with the experience from Llorkh and Loudwater, you should be ready to level up. It’s worth returning to Yartar for training before heading to Star Mounts for the final statuette.
Quests: You will receive the third statuette, The Statuette of the North, in the Event 11 before leaving the Arena area. At the start of this map, your existing statuette(s) will be removed before fighting in the arena. When you find the 3rd statuette your other statuette(s) will be returned as well. If you have been following the maps in order, you should have 3 statuettes so far – East, West and North.
Leaving: Head to Yartar (NW) to level up at the Hall of Training (Event 5) before heading to Star Mounts for the final statuette.
 The two-year-long War of the Returned Regent freed the Vale from Rensha rule. Finally, in the Year of the Wandering Wyrm, 1317 DR, Nanathlor Greysword defeated Pasuuk and the Renshas’ forces at the battle of Tanglefork and became the ruler of Loudwater. However, some histories marked his reign as commencing four years earlier, circa 1313 DR. In either case, the start of Nanathlor’s reign marked the official founding of Loudwater.
In Tarsakh of the Year of Shadows, 1358 DR, on a number of separate occasions, the residents of farm holdings on the outer edges of Loudwater’s domain heard eerie howling and later discovered corpses near their lands. These were identified as various wicked beings, including two drow and some fish-like humanoid, and all carried bite marks. Nanathlor was notified and he formally reported the news. A search of caves in the Delimbiyr valley showed sign of recent occupation, but no connection to underground. Later that year, in Eleasias, a mysterious healer of the High Wood called Radoc helped victims of an orc raid and escorted them to Loudwater. His odd appearance, taciturn nature, and purchase of supplies with crystals made him the subject of rumor before he departed.
Nanathlor ruled in relative peace for 52 years until Malarite lycanthropes attacked the city after a blood-red moon appeared in the sky over the Vale. Nanathlor himself was on his deathbed but the citizenry, led by a young man named Stedd Rein saved the town when Stedd opened his father’s stock of silvered weapons.[citation needed] Kalahar Twohands, Gauntlet of the western marches, replaced Nanathlor, who didn’t survive to see his city saved. Kalahar oversaw the most turbulent years in Loudwater’s history since the war, including a mass migration of orcs, threats from a bandit army and their illithid allies, dragons and several attacks from the Zhentarim.
Along with Secomber, Loudwater was the only settlement of any size in the area to survive the effects of the Spellplague, though it was much reduced in size and had been almost completely abandoned by the elves. Still, it managed to resist the dangers of the surrounding area. What it struggled to cope with was internal troubles. There was barely enough trade to keep the town afloat and dangerous criminals replaced the small-time thieves guild that had been operating there. Many foundlings discovered on the shores of Highstar Lake came to live and grow up in the town, unknowingly the spawn of some fishlike creature who dwelt beneath the lake’s waters.
By 1491 DR, the northern wizard Telbor Zazrek was the High Lord. Telbor was a corrupt puppet of the Zhentarim who took hefty kickbacks in order to ensure Zhentarim trade goods were the only ones most folk could afford
1 – Hellhounds
|
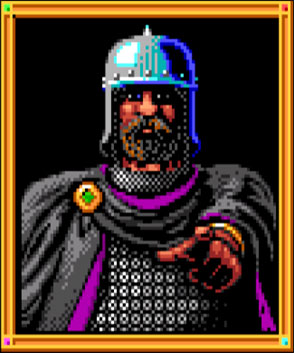
2 – General Vaalgamon
|
3 – Muthtur
|
||
4 – Griffons
|
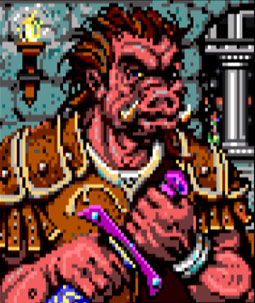
2 – Ogres
|
3 – Zhentil Fighters
|