THE STAR MOUNTS
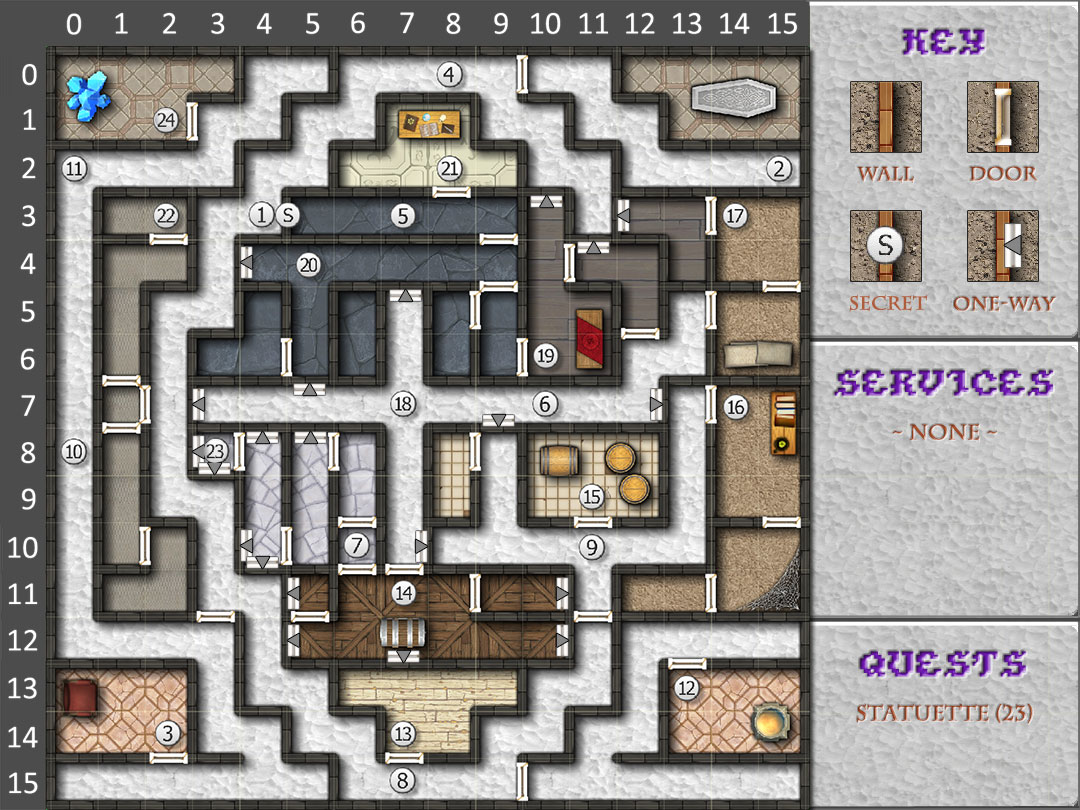
 1. Secret Area – The secret door to the east here leads towards Ceptienne’s inner sanctum.
2. Entrance – This is where the aarakocra drop off the party as they enter the complex. They stay and wait for the party indefinitely. The party can return here at any time, with or without the statuette of the South, and be transported down the mountain. This is a good place to rest and heal the party, rememorize spells, and save the game.
3. Encounter – Griffons and a medusa attack the party here.
4. Hologram – A projection of Ceptienne appears here and says (truthfully) that 12 doors separate the party from the magic item that they seek. She appears to enjoy toying with the party and feels she can destroy them at any time.
5. Hologram – Ceptienne’s projection reappears to say ‘One door discovered, eleven more to find!’
6. Hologram – A projection of an angry Ceptienne appears to say that she has grown tired of the party and no longer enjoys watching their progress.
7. Hologram – Ceptienne’s projected image appears again, this time to scream at the party in rage.
8. Hologram – The projection of a contented Ceptienne appears to taunt the party. She is happy because the party is so far off track.
9. Hologram – Ceptienne’s projection appears here to explain how the maze was designed.
10. Hologram – Ceptienne taunts the party here again.
11. Noise – The party hears a loud roaring noise here. It comes from the black dragons in the room just to the north.
12. Encounter – A group of ogres and griffons rushes at the party from opposite sides of this room.
13. Encounter – A nest of griffons is in this room.
14. Encounter – Ogres and harpies are in this room.
15. Encounter – Ogres and medusae attack the party here.
16. Encounter – A pair of black dragons are in this room. Once they are defeated, Ceptienne’s image (if she is still alive) appears to deny-truthfully-that the party has killed her personal steed.
17. Encounter – A hellhound and harpies are in this room.
18. Encounter – Hellhounds and medusae guard this corridor.
19. Encounter – Ogres, accompanied by hellhounds, have been looking for the party and find them here.
20. Encounter – Griffons and hellhounds guard this corridor.
21. Encounter – Griffons are nesting in this room.
22. Encounter – A hellhound and griffons attack the party here.
23. Statuette (Quest) – This is Ceptienne’s chamber, and is defended by medusae, harpies and Ceptienne herself.
It is important for the party to be fully healed and have their spells memorized before starting this battle. Once the action starts, try to take out Ceptienne with a hold person spell. Try to kill the harpies with missile weapons and spells; they can charm characters that they get close enough to touch.
Among the treasure items are Bracers of Defense AC6, a dagger +1, and a Necklace of Missiles. There is also a Wand of Defoliation, which is especially effective against shambling mounds. This is best saved for the final battles at Ascore. After winning this battle, the party finds the statuette of the South.
24. Encounter – A small group of black dragons are in this room; each wants to destroy the party to gain Ceptienne’s favor. Once all but one are defeated the remaining wounded dragon attempts to escape, only to have its wings fail and be crushed on the rocks far below.
 Synopsis: This is the site of the mountain fortress of the beautiful but evil magicuser Ceptienne, who has allied herself with the Zhentarim. She rides a black dragon when she sets forth from her magical aerie.
The statuette of the South is hidden here.
The Star Mounts are a great mountain range that lies at the heart of the map, deep within the High Forest. They are so high and the winds they create are so strong and unpredictable that-just as Amanitas foretold-birds dare not fly there. Only dragons and aarakocra can traverse these unfriendly skies.
At the foot of the mountains, where the river from Secomber meets the mountains, the party finds a group of giant snakes and shambling mounds attacking an aarakocra. The party has the chance to rescue the aarakocra, earning its gratitude.
Let the enemy come to the party in this battle, using the natural protection of the forest to limit the number of monsters that can attack at any one time while archers pepper them with arrows. Fireball and Lighting Bolt spells are very useful against the snakes, while the Wand of Ice Storm, even doing just one half damage, still softens up the Shambling Mounds.
Accept the aarakocra’s offer to carry the party up to Ceptienne’s hidden dungeon. Refuse the aarakocra if the party isn’t ready to undertake this mission-the offer is renewed every time the party returns to this location.
The aarakocra sense that Rishpal is evil and refuse to carry him. He flees once he is found out.
Ceptienne’s aerie is built as a maze based upon the three different runes for the “C” that begins her name, each being superimposed upon the other, both normally and upside down. The intricate pattern this creates is so complicated that knowing about the runes doesn’t really help the party navigate, but it feeds Ceptienne’s considerable ego.
The maze has many one-way doors that can make the party wander in circles if they don’t have access to a map. The one key secret door is also easy to miss. Finally, whole portions of the complex don’t hold anything for the party except difficult battles with high level monsters.
The party must find Ceptienne’s chamber and defeat her in order to gain the statuette of the South. Returning to the aerie’s entrance, they can meet the aarakocra and be flown back to the mountain’s base.
Ceptienne is guarded by a variety of monsters, including especially dangerous ones like harpies and medusae. Do not enter her dungeon complex until each party member has bought a mirror (available in adventurer supply shops in many towns). Characters Must READY the mirror during combat with the medusae in order to avoid being turned to stone. Characters who are turned to stone may be returned to flesh at any temple, but the fee for this process is very expensive.
Resting: The party can rest in any room in the mountain fortress . They cannot rest in the corridors.
Wandering Monsters: None.
 Objective: Fighting Vaalgamon’s armies are optional here. You can move past these encounters to LLorkh, which is east of Loudwater.
Experience: The party can receive tremendous experience here for fighting Vaalgamon’s armies. It is recommended to chip away at Vaalgamon’s army (14-19) before engaging the main army (20). The main battle (20) will still offer a large amount of experience, just be fully prepared.
Quests: There is technically no quest here, but rather a story development around clashes with General Vaalgamon and his Zhentil army over the attainment of the Statuettes.
Leaving: Head to Llorkh after Loudwater. Llorkh has lots of traps and encounters, rest and restore hit points and spells before travelling.
 The two-year-long War of the Returned Regent freed the Vale from Rensha rule. Finally, in the Year of the Wandering Wyrm, 1317 DR, Nanathlor Greysword defeated Pasuuk and the Renshas’ forces at the battle of Tanglefork and became the ruler of Loudwater. However, some histories marked his reign as commencing four years earlier, circa 1313 DR. In either case, the start of Nanathlor’s reign marked the official founding of Loudwater.
In Tarsakh of the Year of Shadows, 1358 DR, on a number of separate occasions, the residents of farm holdings on the outer edges of Loudwater’s domain heard eerie howling and later discovered corpses near their lands. These were identified as various wicked beings, including two drow and some fish-like humanoid, and all carried bite marks. Nanathlor was notified and he formally reported the news. A search of caves in the Delimbiyr valley showed sign of recent occupation, but no connection to underground. Later that year, in Eleasias, a mysterious healer of the High Wood called Radoc helped victims of an orc raid and escorted them to Loudwater. His odd appearance, taciturn nature, and purchase of supplies with crystals made him the subject of rumor before he departed.
Nanathlor ruled in relative peace for 52 years until Malarite lycanthropes attacked the city after a blood-red moon appeared in the sky over the Vale. Nanathlor himself was on his deathbed but the citizenry, led by a young man named Stedd Rein saved the town when Stedd opened his father’s stock of silvered weapons.[citation needed] Kalahar Twohands, Gauntlet of the western marches, replaced Nanathlor, who didn’t survive to see his city saved. Kalahar oversaw the most turbulent years in Loudwater’s history since the war, including a mass migration of orcs, threats from a bandit army and their illithid allies, dragons and several attacks from the Zhentarim.
Along with Secomber, Loudwater was the only settlement of any size in the area to survive the effects of the Spellplague, though it was much reduced in size and had been almost completely abandoned by the elves. Still, it managed to resist the dangers of the surrounding area. What it struggled to cope with was internal troubles. There was barely enough trade to keep the town afloat and dangerous criminals replaced the small-time thieves guild that had been operating there. Many foundlings discovered on the shores of Highstar Lake came to live and grow up in the town, unknowingly the spawn of some fishlike creature who dwelt beneath the lake’s waters.
By 1491 DR, the northern wizard Telbor Zazrek was the High Lord. Telbor was a corrupt puppet of the Zhentarim who took hefty kickbacks in order to ensure Zhentarim trade goods were the only ones most folk could afford
1 – Inn
|
2 – Resident
|
3 – Gnoll
|
||
4 – Supplies
|
2 – Ghoul
|
3 – Zombie
|
||
4 – General Vaalgamon
|
2 – Rishpal
|