SUNDABAR
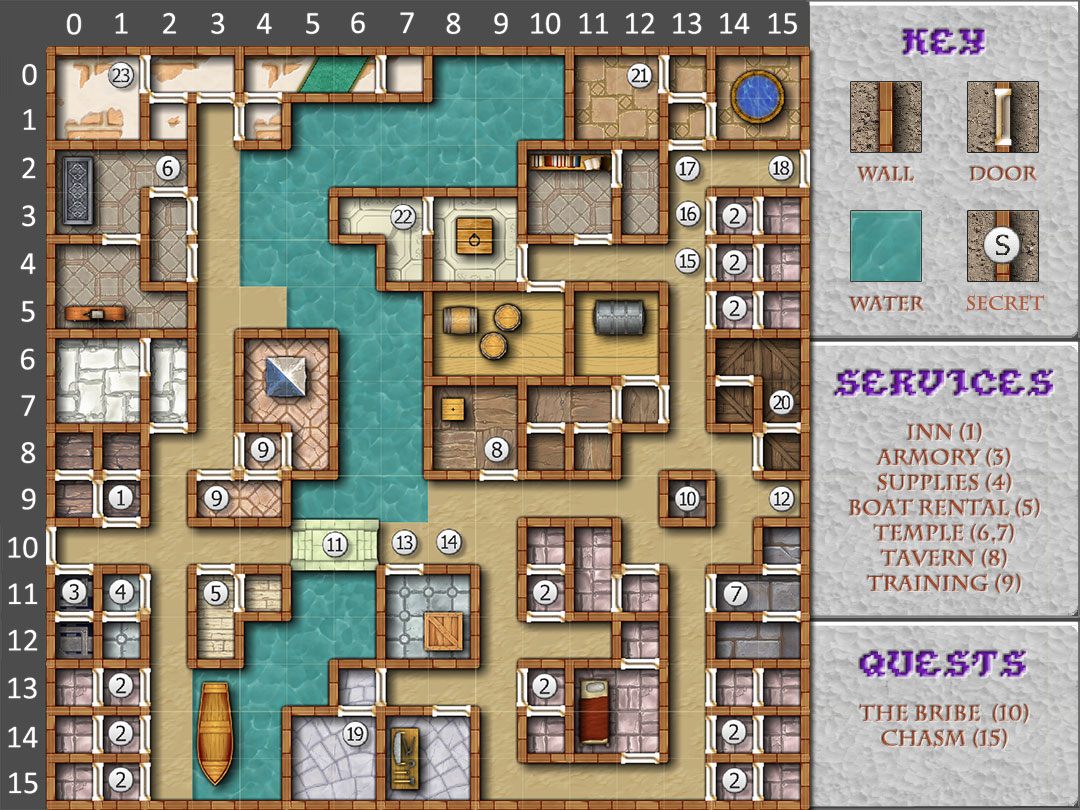
 1. Khumonne Inn – Be sure to rest here, rememorize all spells and save the game before facing the battles that lie ahead in Sundabar.
2. These are residences – They hold three different local stories about all the activities as the Zhentadm forces rushed through town. The second house the party visits holds an old thief who picked Vaalgamon’s pocket. He gives the party a note from the Zhentadm leader that castigates the general for allowing the party to threaten all their plans. The note orders Vaalgamon to guard all routes through Ascore.
3. Standroun’s Weapons and Armor – Arms and Armor for sale here.
4. Hegemma’s Store – Standard Adventurer supplies.
5. North Branch Boat Rentals – If the party has all four statuettes, this shop is closed until all the major battles in the streets of Sundabar have been fought.
6. Temple of Tyr – Healing services are available here.
7. Temple of Helm – The services and fees are the same as for the Temple of Tyr.
8. Auld Macdon’s Tavern – Fight for experience here. .
9. Hall of Training – You can level up here.
10. The Bribe (quest) – If the party has all 4 statuettes, they hear a strange sound coming from this fountain. A magic mouth offers to trade the statuettes for a great treasure trove of gold.
Reject the offer, and the fountain reveals itself to be a stone golem and attacks the party. The Sword of Stonecutting (made in Neverwinter from meteorite ore found in Tuern) makes this battle much easier.
If the party accepts the fountain-golem’s offer, it is given a huge pile of gold coins-more than the characters can carry. The Zhentadm successfully conquer the Savage Frontier, and the party is subsequently captured and thrown into prison . This ends the game, just as it does when the party members are all killed by monsters.
11. Illusions – If the party has all 4 statuettes, they think they see monsters up ahead to the east.
12. Illusions – Someone or something has melted the stone of this gate to seal it shut . Another gate farther north still leads to Ascore, but that is the direction in which Vaalgamon wants the party to go.
13. Illusions – If the party has all 4 statuettes, the plaza to the east appears to be full of monsters-far too many for the party to
overcome. This is an illusion created by Vaalgamon to trick the party party-continue going east and it vanishes.
14. Illusions – If the party has all 4 statuettes the illusionary horde of monsters vanishes here .
15. Chasm (Quest) – If the party has all 4 statuettes, the street to the north appears to be divided by a deep chasm . As the party speculates, this is another illusion . But, an ambush waits for the party so that when they leap across the illusory chasm they leap into encounter 16.
16. Illusions – If the party has all 4 statuettes, a group of Zhentil fighters and ogres ambush the party here as they leap across the illusory chasm.
17. Illusions – The beautiful voice of a woman singing can be heard here. It is the song of a harpy who seeks to entrap the party.
18. Illusions – If the party has all 4 statuettes, Zhentil fighters, hellhounds and harpies launch a last-ditch attack against the party here to try to stop them from reaching Ascore.
19. Encounter – Griffons are living in this building.
20. Encounter – Hellhounds and Zhentil fighters attack the party here.
21. Encounter – Harpies try to charm the party with their songs here.
22. Encounter – Hellhounds and ogres are found here.
23. Encounter – A hellhound and a small group of medusae attack the party as they enter this room.
 Synopsis : Sundabar is a major town in the northeast section of the map. Located at the edge of an opening in the mountains, it commands the only road that leads to the dead city of Ascore.
Once the party has the four statuettes, Vaalgamon knows they have the power to deal the Black Order a severe blow. He uses every method at his disposal-from bribery to trickery, from magic to sheer force-to stop them here and seize the magic items before they reach Ascore.
Resting: The party can rest anywhere but on the city streets.
Wandering Monsters: If the party doesn’t have all 4 statuettes, groups of ogres or Zhentil fighters may appear anywhere in the city. There is no limit to these battles. If the party has the statuettes the same monsters appear, but much less frequently and never in the city streets.
 Objective: Avoid giving the magic mouth the statuettes, clear out the city of Vaalgamon’s troops and head to Ascore through the NE door.
Experience: The encounters are not too difficult here. The harpies can cast Charm Person, so make sure to cast Bless and Prayer before combat to help with Saving Throws and have your Cleric memorize Dispel Magic in case a member of the party (especially with a Fireball Spell) is charmed.
Quests: There is a stone fountain here that will promise you a sea of gold for your statuettes, refuse the offer and the fountain turns into a stone golem. Use your Stonecutter +3 sword here. Also there is an illusory chasm here that you can cross to fight some of Vaalgamon’s forces.
Leaving: Head out the NE door and then due East to Ascore to finish the game. Rest, heal your party and memorize your spells before heading out. Check to see if you can level up at the Training Hall (9) before leaving.
 The two-year-long War of the Returned Regent freed the Vale from Rensha rule. Finally, in the Year of the Wandering Wyrm, 1317 DR, Nanathlor Greysword defeated Pasuuk and the Renshas’ forces at the battle of Tanglefork and became the ruler of Loudwater. However, some histories marked his reign as commencing four years earlier, circa 1313 DR. In either case, the start of Nanathlor’s reign marked the official founding of Loudwater.
In Tarsakh of the Year of Shadows, 1358 DR, on a number of separate occasions, the residents of farm holdings on the outer edges of Loudwater’s domain heard eerie howling and later discovered corpses near their lands. These were identified as various wicked beings, including two drow and some fish-like humanoid, and all carried bite marks. Nanathlor was notified and he formally reported the news. A search of caves in the Delimbiyr valley showed sign of recent occupation, but no connection to underground. Later that year, in Eleasias, a mysterious healer of the High Wood called Radoc helped victims of an orc raid and escorted them to Loudwater. His odd appearance, taciturn nature, and purchase of supplies with crystals made him the subject of rumor before he departed.
Nanathlor ruled in relative peace for 52 years until Malarite lycanthropes attacked the city after a blood-red moon appeared in the sky over the Vale. Nanathlor himself was on his deathbed but the citizenry, led by a young man named Stedd Rein saved the town when Stedd opened his father’s stock of silvered weapons.[citation needed] Kalahar Twohands, Gauntlet of the western marches, replaced Nanathlor, who didn’t survive to see his city saved. Kalahar oversaw the most turbulent years in Loudwater’s history since the war, including a mass migration of orcs, threats from a bandit army and their illithid allies, dragons and several attacks from the Zhentarim.
Along with Secomber, Loudwater was the only settlement of any size in the area to survive the effects of the Spellplague, though it was much reduced in size and had been almost completely abandoned by the elves. Still, it managed to resist the dangers of the surrounding area. What it struggled to cope with was internal troubles. There was barely enough trade to keep the town afloat and dangerous criminals replaced the small-time thieves guild that had been operating there. Many foundlings discovered on the shores of Highstar Lake came to live and grow up in the town, unknowingly the spawn of some fishlike creature who dwelt beneath the lake’s waters.
By 1491 DR, the northern wizard Telbor Zazrek was the High Lord. Telbor was a corrupt puppet of the Zhentarim who took hefty kickbacks in order to ensure Zhentarim trade goods were the only ones most folk could afford
1 – Inn
|
2 – Resident
|
3 – Gnoll
|
||
4 – Supplies
|
2 – Ghoul
|
3 – Zombie
|
||
4 – General Vaalgamon
|
2 – Rishpal
|